Categories
Category: Uncategorized
Gravatar stands for “Globally Recognized Avatar” and is an online service that provides a unique way of associating your identity with a consistent avatar image across numerous websites and platforms on the web. By using Gravatar, you eliminate the need to set up a new profile image on each site you visit or platform you use, as it automatically displays your chosen avatar wherever you interact, be it blog comments, forum posts, or other online engagements.

This service not only simplifies managing your online presence but also helps in building and maintaining personal branding. Whether you’re a blogger, a developer, or simply an avid commenter, your Gravatar ensures that your contributions are instantly recognizable across the web. This tool transcends basic functionality and serves as a key element in establishing your digital identity, paving the way for increased credibility and visibility in your respective industry or area of interest.
Key Takeaways
- Gravatar is a user-friendly tool for maintaining a consistent personal avatar across multiple web platforms.
- A Gravatar enhances personal branding and increases the recognition of your contributions online.
- Utilizing Gravatar can streamline your digital presence and improve network credibility.
Understanding Gravatar

In the digital world, your online presence is often represented by a single image: your avatar. Gravatar ensures this avatar is uniformly recognized across various platforms, tying your online interactions to a visible brand identity.
Defining Gravatar
Gravatar stands for “Globally Recognized Avatar.” It is a service that connects your avatar to your email address, allowing you to maintain a consistent profile image across all websites that support Gravatar. This is particularly beneficial if you have a WordPress.com account, as your Gravatar will automatically display next to comments or posts you make on WordPress sites.
Importance of a Globally Recognized Avatar
Having a globally recognized avatar strengthens your online brand and identity. When you use Gravatar, you create a unique identity that others begin to recognize. This recognition is crucial for building credibility and trust within the digital community. Whether you’re commenting on a blog or posting on a forum, your Gravatar provides a visual cue to your audience, linking back to your brand or personal identity.
Setting Up Your Gravatar Account

Before you bring your online identity to life, you’ll need a Gravatar account. This process is straightforward, requiring you to create a WordPress.com account, upload your chosen avatar, and select an appropriate rating for it.
Creating a WordPress.com Account
To get started with Gravatar, you must sign up for a WordPress.com account. Navigate to the sign-up page and enter your email address, choose a username, and set a password. After submitting the form, WordPress will send you a confirmation email. Click the activation link in the email to activate your account.
Uploading Your Avatar
Once your WordPress.com account is active, log in and navigate to Gravatar. Here, you’ll click on “Add a new image” to upload your avatar. You can select a picture from your computer or import it from an online source. After uploading, crop the image as you like and save your changes.
Choosing Your Gravatar Rating
Gravatar uses ratings to ensure avatars are appropriate for different audiences. Choose a rating that best fits your avatar: G (suitable for all audiences), PG (possibly offensive, usually for audiences 13 and above), R (intended for adult audiences), or X (even more explicit than R). Your Gravatar rating will help ensure that your avatar appears on sites that match your audience criteria.
Integrating Gravatar with Your Website

To enhance your website’s user engagement, integrating Gravatar is beneficial as it links globally recognized avatars with user comments, fostering a sense of community and familiarity.
Connecting WordPress with Gravatar
If your website is powered by WordPress, setting up Gravatar is straightforward due to its built-in support. Start by ensuring that your WordPress Discussion settings are configured to display avatars:
- Navigate to your dashboard.
- Click on Settings and select Discussion.
- Scroll down to the Avatars section.
- Ensure the “Show Avatars” option is checked.
Next, prompt your users to create a Gravatar account. Their Gravatar will automatically display next to their comments across your blog and any other Gravatar-enabled sites.
Customization Options
Gravatar also offers customization capabilities for your website and user profiles. In the Discussion settings panel, you can:
- Choose the rating for avatars allowed on your blog (G, PG, R, or X).
- Select a default avatar for users without a Gravatar, ensuring a consistent look across your comment sections.
Additionally, you can use APIs to further tailor the Gravatar integration. For example, using Gravatar’s API opens up possibilities such as displaying user avatars in custom locations on your site, or integrating them with user account sections.
By personalizing these settings, you not only establish a unique online profile identity for your users but also create a cohesive aesthetic throughout your self-hosted or WordPress.com site, enriching the overall commenting experience.
Maximizing Gravatar for Personal Branding

Gravatar serves as a potent tool for crafting your online presence. With a consistent Gravatar, you can streamline your personal branding across various platforms.
Establishing Online Identity
Your Gravatar is more than just a profile picture; it’s the visual cornerstone of your online identity. By selecting a professional and memorable image, you ensure that every interaction on the web reflects your personal brand. This uniformity helps in building a strong and recognizable branding foundation. Remember to include your contact information in your Gravatar profile, solidifying your identity and providing a direct line for opportunities.
Increasing Visibility and Credibility
Utilizing Gravatar effectively enhances your visibility and credibility on websites. It links your online profiles with a consistent visual cue, leading to improved brand recognition. Here’s how you do it:
- Use a Gravatar image that aligns with your professional persona, contributing positively to your reputation.
- Ensure your image is used across all your platforms, amplifying brand recognition.
- Gravatar images that appear next to your comments and posts assure other users of your authentic participation, boosting your credibility.
By embracing Gravatar for these purposes, you elevate your professional stature online.
Gravatar in Social Media and Developer Platforms

Gravatar allows you to present a consistent profile photo across multiple platforms, enhancing your online presence as a commenter or developer.
Expanding Your Digital Footprint
By integrating your Gravatar with various social media and developer networks, you propel your digital footprint to new heights. It ensures your unique avatar accompanies each comment or post you make, fostering recognition in the online community. For an online business, this consistency supports brand growth and can make your presence more memorable across social channels.
Gravatar on Popular Platforms
Your Gravatar extends its utility beyond mere image display. On platforms like GitHub, it serves not just as a profile photo but also marks your contributions and collaborations. Using Gravatar on Blogger or Stack Overflow enhances your role as a commenter or authority in specific domains. In Slack, it can distinguish your messages within a workspace, especially useful when bots are part of the conversation. Integrating your Gravatar across these platforms unifies your identity as a developer, and as part of a community where familiarity and credibility are paramount.
Managing Your Gravatar

Gravatar stands for “Globally Recognized Avatar” and is seamlessly integrated across various websites. Properly managing your Gravatar ensures your preferred avatar and associated information are consistently displayed.
Editing Your Gravatar Information
Once you sign in to Gravatar using your WordPress.com account, you can edit your profile. Under the ‘My Profile’ section, update your display name, username, and email addresses. Remember, your primary email address will be the one associated with your main Gravatar image. Use the password you created for WordPress.com to sign in, ensuring it is secure and unique.
To update your photo, navigate to ‘Add an Email Address’ under your Gravatar profile. Here, you can add new photos and crop them to fit. For images, ensure they’re professional and align with how you wish to be perceived across various platforms.
Managing Multiple Avatars
Gravatar allows you to manage multiple avatars for different email addresses. Visit ‘My Gravatars,’ and you can add different images for each email you have registered.
- To add a new avatar, click “Add a new image” and select Default Avatar for emails without a custom image.
- You can crop your chosen photos after uploading to fit the Gravatar’s square format.
- Each email address can showcase a different photo, making it versatile for personal or professional use.
Remember to save your changes for each email address to ensure your new avatars are updated accordingly.
Security and Privacy Considerations

When you use Gravatar, your primary concerns are safeguarding your online presence and ensuring that sensitive details remain private.
Controlling Your Online Image
By setting up a Gravatar—a Globally Recognized Avatar—you take control of your online image across multiple platforms. This image is what people will see next to your comments, posts, or profile details on any website that integrates with Gravatar. What’s important here is knowing how to effectively manage your Gravatar to maintain a consistent and professional image that’s associated with your email address. You should consider regularly updating your Gravatar to keep your online persona fresh and in line with your current branding or personal expression. If you feel that a certain Gravatar no longer represents you or it might harm your professional image, you have the option to disable your Gravatar at any time, thus reverting to a default image.
Handling Sensitive Information
Your Gravatar links your chosen image with your email address to create a consistent visual identity on various websites, including those where you may post comments or register profiles. The security angle kicks in with the necessity of protecting this email address, along with any other personal information you might share on these platforms. You must verify the privacy policies of the sites you’re engaging with to understand how they might share your Gravatar or any associated data. The convenience of a Gravatar comes with the responsibility of knowing that, like any digital footprint, it can be traced back to you. Therefore, use caution when deciding which websites to link with your Gravatar and consider creating a unique email address specifically for your Gravatar login, enhancing your privacy and security online.
Advanced Gravatar Features

When you begin to harness the full potential of Gravatar, you go beyond just profile pictures. Understanding and leveraging the advanced features can be a game-changer, especially if you’re looking to achieve brand consistency and make a mark in the digital world.
Leveraging Gravatar APIs
Gravatar APIs allow you to seamlessly integrate user avatars into your applications. With Gravatar APIs, you can:
- Programmatically retrieve Gravatar images and profile information.
- Integrate avatars into your blog or e-commerce site without requiring users to upload new pictures.
- Personalize user experience on your platform by displaying familiar avatars.
Achieving Brand Consistency Across Platforms
A consistent brand image is crucial in marketing. Gravatar ensures that your brand’s visual representation remains uniform across various websites and platforms. By doing so, you:
- Establish a consistent branding element that users recognize instantly.
- Enhance your professional credibility by providing a uniform visual cue that connects your presence on different online forums and communities.
Using advanced Gravatar features, you bolster your marketing efforts with a cohesive brand strategy that operates on both individual and company levels.
Impact of Gravatar on Web Engagement

Gravatar stands as a key tool for elevating your digital identity, directly influencing both traffic and engagement on web platforms where your presence is seen.
Boosting Website Traffic and User Interaction
Using Gravatar can have a significant effect on website traffic. When you comment on blogs and forums, your Gravatar provides a visual cue that can make your contributions stand out. This not only increases the likelihood of other users engaging with your comments, but can also entice them to click through to your profile or website, potentially increasing traffic. By maintaining a consistent logo or image across platforms, you create a recognizable brand for yourself, which can foster user interaction.
Encouraging Community and Discussion
Having a Gravatar next to your name in comments sections adds a personal touch that encourages community building and discussion. It’s like having a colorful badge that accompanies all your online interactions—it makes your comments more relatable and helps to facilitate engagement. By establishing this personal connection, you increase your reach as other community members are more likely to remember and interact with you on future posts.
Tips and Best Practices for Gravatar Users

Before diving into the specifics, it’s important to understand that your Gravatar is not just an image. It represents you or your brand across numerous platforms. By optimizing and avoiding common mistakes, you ensure that your Gravatar effectively enhances your online presence.
Optimizing Your Gravatar for Better Recognition
When selecting your Gravatar, choose an image that is clear, recognizable, and aligns with your professional branding. It’s your visual calling card, so make it count. If you’re an expert in a specific niche or field, consider using imagery that reflects your expertise. For instance, if you’re a nature photographer, a stunning landscape could be a wise choice.
- Profile: Ensure that your Gravatar is linked to a well-constructed profile. A thoughtfully written bio which succinctly details your professional experience and areas of maturity can transform a mere image into a portfolio piece.
- Tutorial: Many sites provide a step-by-step tutorial on customizing your Gravatar. Take advantage of these resources to fine-tune your image and profile details.
Avoiding Common Pitfalls
Beware of common pitfalls that can dilute your Gravatar’s impact. An overly complex or cluttered image can backfire by making your brand feel disorganized. Additionally, inconsistent branding across different sites can confuse your audience.
- Consistency is Key: Use the same image across all platforms where your Gravatar appears. Consistency strengthens recall and reinforces your branding efforts.
- Professionalism Over Pizzazz: A professional or pseudo-professional photo often trumps a quirky avatar in conveying experience and maturity. Keep it simple and professional, especially if you’re using Gravatar for business purposes.
Remember to regularly update your Gravatar to reflect any changes in your professional life that could affect your brand. This ongoing effort ensures that your online presence grows with you.
The Future of Gravatar
In the evolving digital landscape, your Gravatar serves as more than just an image; it is your identity across multiple online platforms. As we peer into the future, expect Gravatars to adapt, ensuring that your online persona remains robust and universally recognized.
Trends in Online Avatars
Automation and Integration: Future iterations of Gravatar could see deeper integration with platforms, thanks to companies like Automattic, the parent company of WordPress. Gravatar may increasingly leverage automation, enabling automatic updates of your avatar across services powered by Atlassian and similar tech entities.
Diverse Representation: Expect a push for more personalized and diverse avatars. Gravatars may soon offer dynamic options that better represent your individuality across non-profit initiatives, professional settings, and personal blogs.
Anticipating Changes in User Requirements
Security and Privacy: As an authoritative voice on digital identity, Gravatar will likely heighten its focus on security policies to protect your online presence, befitting both small businesses and individual users.
Seamless User Experience: Gravatar’s roadmap may include features that streamline how you control your online image, with a user-friendly dashboard for easy management, aligning with shifting user requirements.
The intersection of identity and technology is set to redefine your digital footprint, and Gravatar aims to be at the forefront, evolving alongside your needs.
Conclusion
Gravatar is an essential tool for establishing your brand and identity across various online platforms. By adopting this globally recognized avatar, you maintain consistency in how you appear on websites, particularly those using WordPress. Not only does it add an authoritative voice to your comments and posts, but it also enhances recognition among users and readers.
- Effortlessly integrate your Gravatar with countless sites.
- Amplify your personal or business brand through a uniform identity.
- Seamlessly present yourself as an authoritative voice with a recognizable image.
Creating and using a Gravatar is straightforward and beneficial for anyone looking to have a consistent identity in the digital realm. It links your online profiles with a single avatar, simplifying your interactions across multiple sites. As the brand you represent becomes more visible, you’ll find that connections with your audience strengthen — all thanks to the ease of identification that Gravatar facilitates. So, take advantage of this simple yet powerful tool and let your Gravatar serve as a visual signature wherever you go online.
Frequently Asked Questions
Gravatar seamlessly works with various online platforms, especially with WordPress. Here, you’ll find straightforward answers to common inquiries about this globally recognized avatar system.
How does Gravatar integrate with WordPress?
Gravatar is natively supported by WordPress, allowing your Gravatar image to automatically appear next to comments and posts if you’re a registered user. This integration means your Gravatar follows you across WordPress-powered sites where you engage.
What are the benefits of using Gravatar?
Using Gravatar, your online identity gets tied to your email address, offering a consistent visual presence across different websites. It saves you time from uploading separate avatars for each site and helps in establishing recognition and trust online.
How can I create and set up my own Gravatar?
To create your Gravatar, visit Gravatar’s website, sign up with your email address, and upload an image. Once set up, your Gravatar will automatically sync with your email across supported platforms.
What privacy considerations exist when using Gravatar?
Gravatar links your avatar to your email address, a personal identifier. Exercise caution when deciding which image to use and consider the implications of associating a specific email with a public avatar, especially on global platforms.
In what ways can Gravatar enhance my online presence?
Gravatar helps you maintain a consistent and professional image across the internet, aiding in personal branding. It ensures your chosen image is recognizable in online communities and comment sections, linking back to your profile or website for increased visibility.
What distinguishes a Gravatar from a regular avatar?
A Gravatar is a ‘globally recognized avatar,’ an image that follows you from site to site appearing beside your name when you do things like comment or post on a blog. Regular avatars are site-specific and do not offer this level of ubiquity or convenience.
Categories
Scribe
Categories
Working With Tango
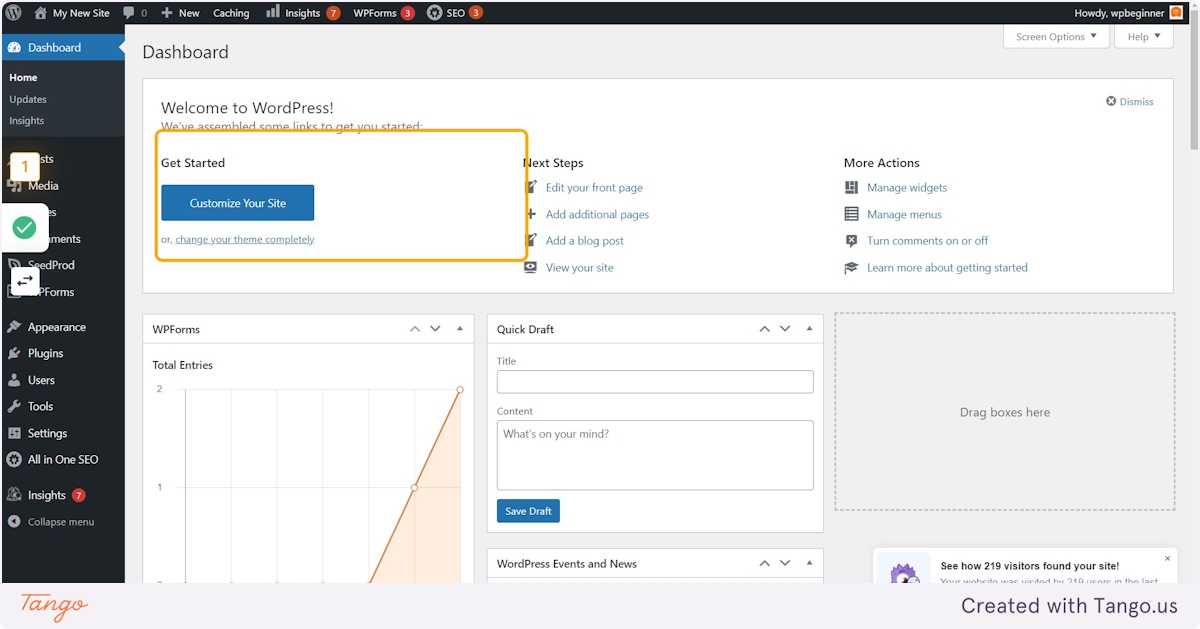
Workflow with Startawpsite and Automatorplugin
Creation Date: October 14, 2021
Created By: Christina Harris
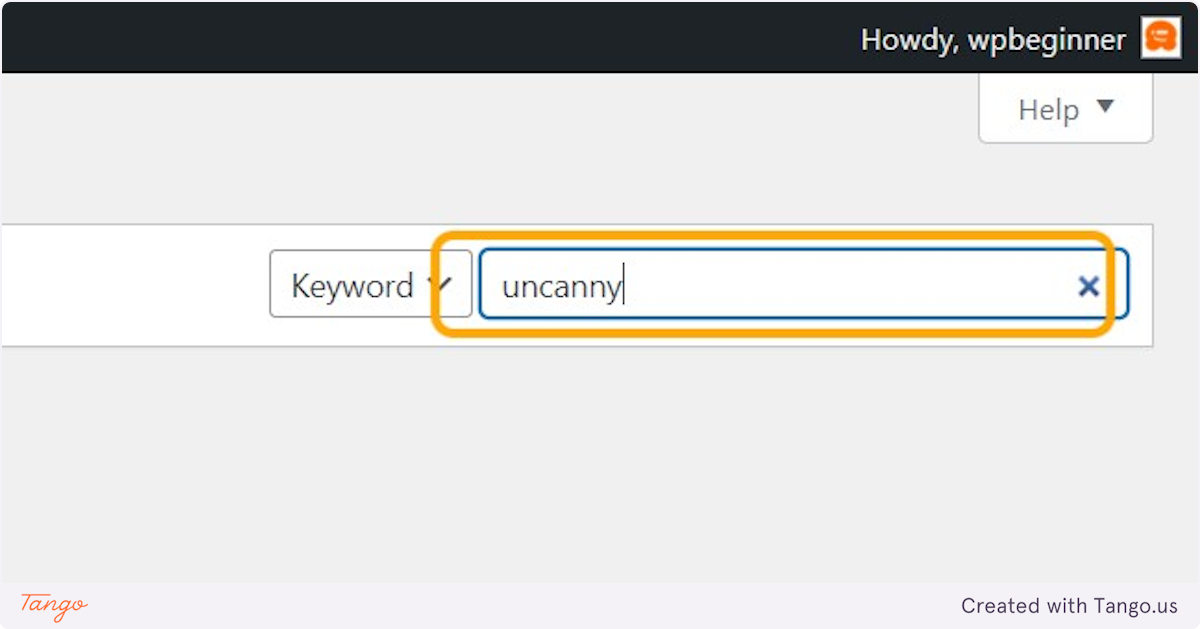
2. Click on Add New

3. Type “uncanny”
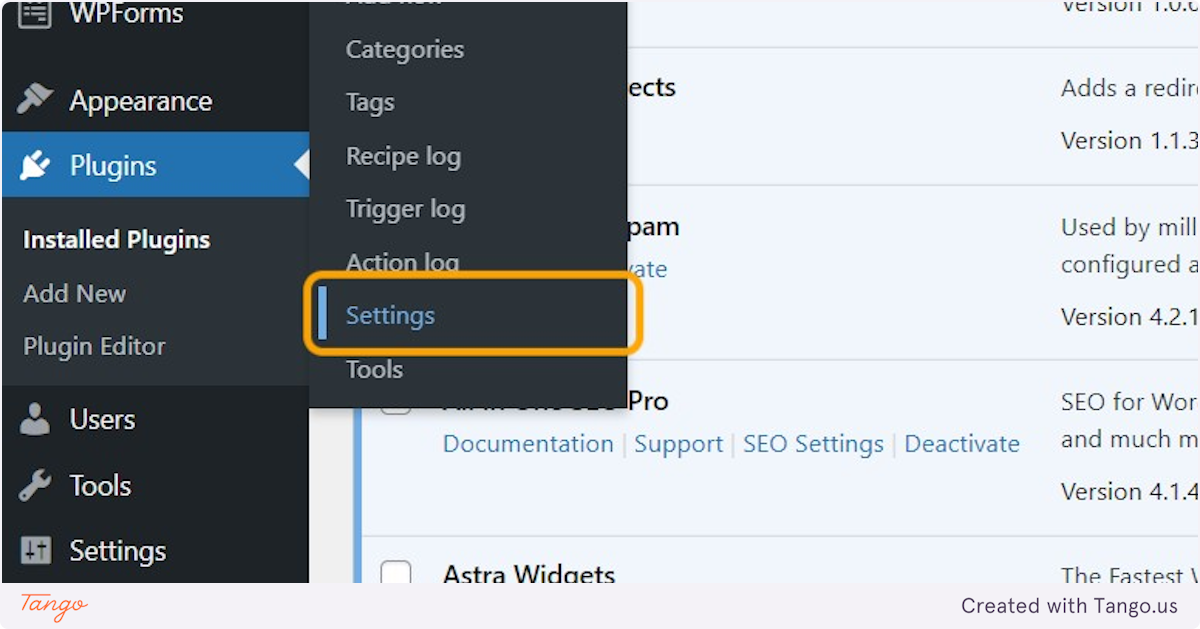
4. Click on Activate

5. Click on Settings
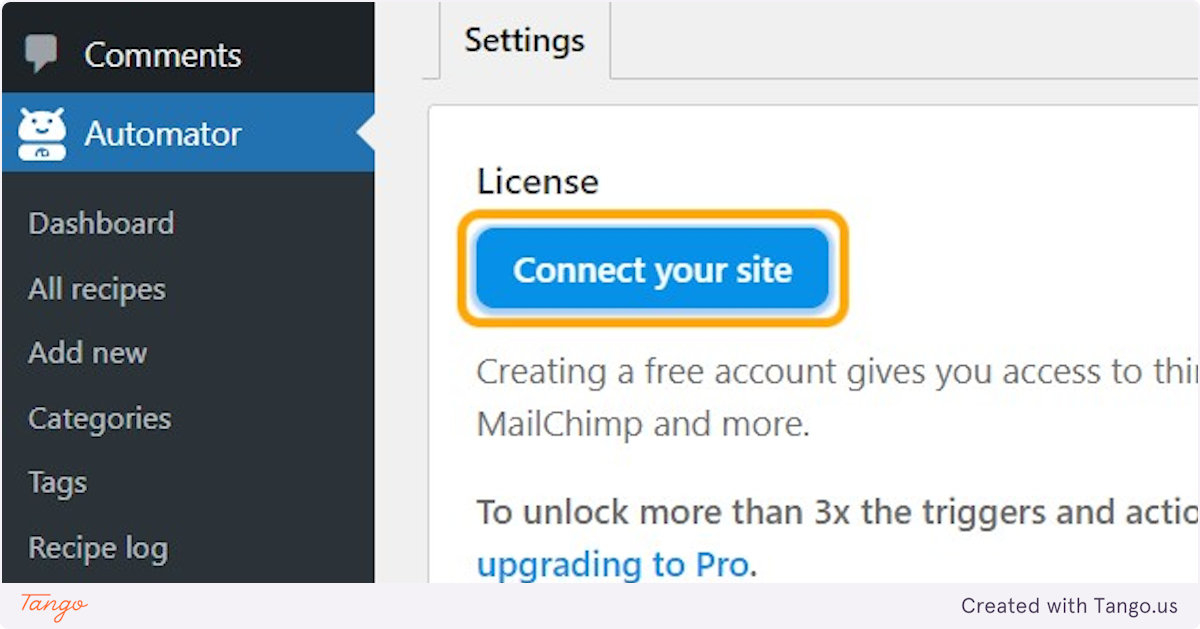
6. Click on Connect your site
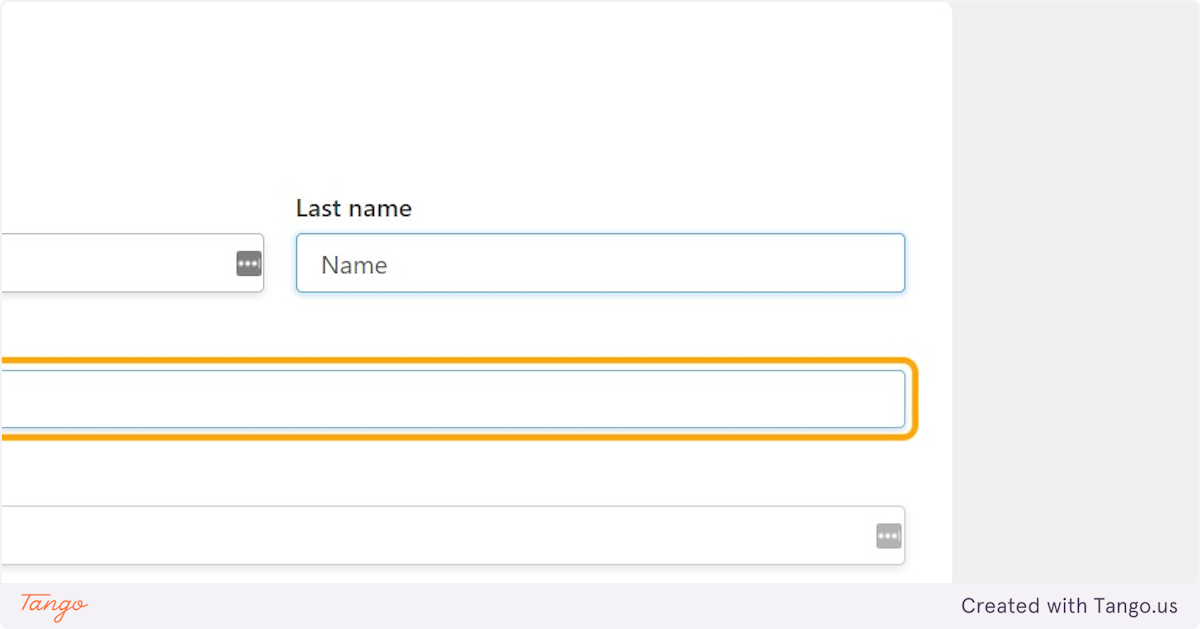
7. Type “Name”
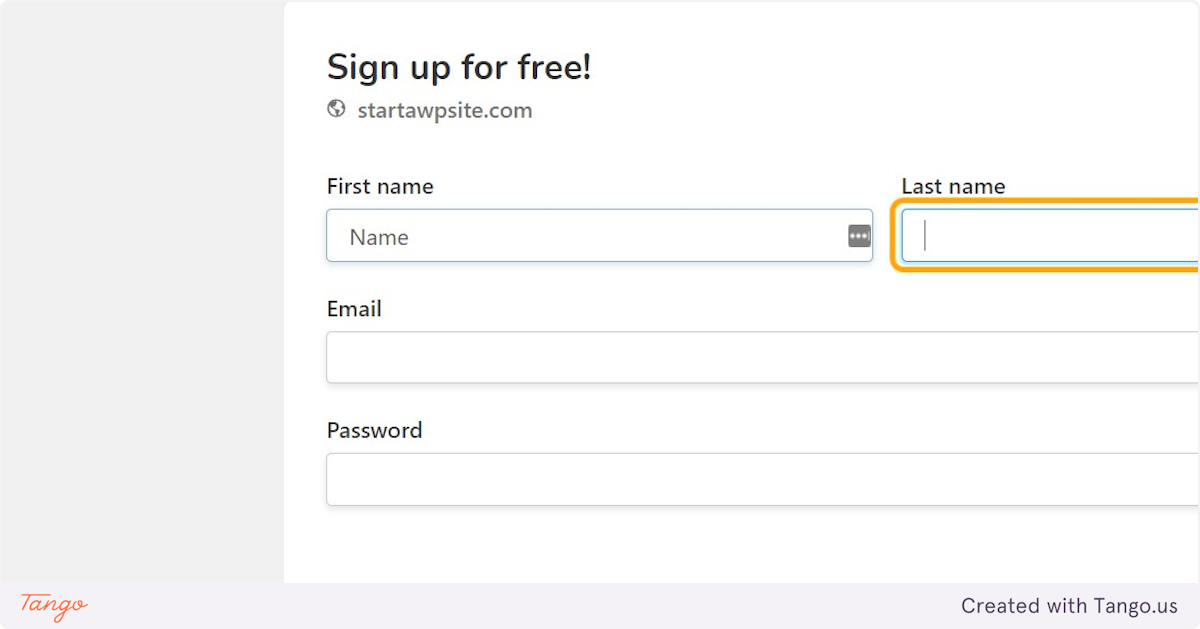
8. Type “Name”
9. Type “wpbeginner@example.com”
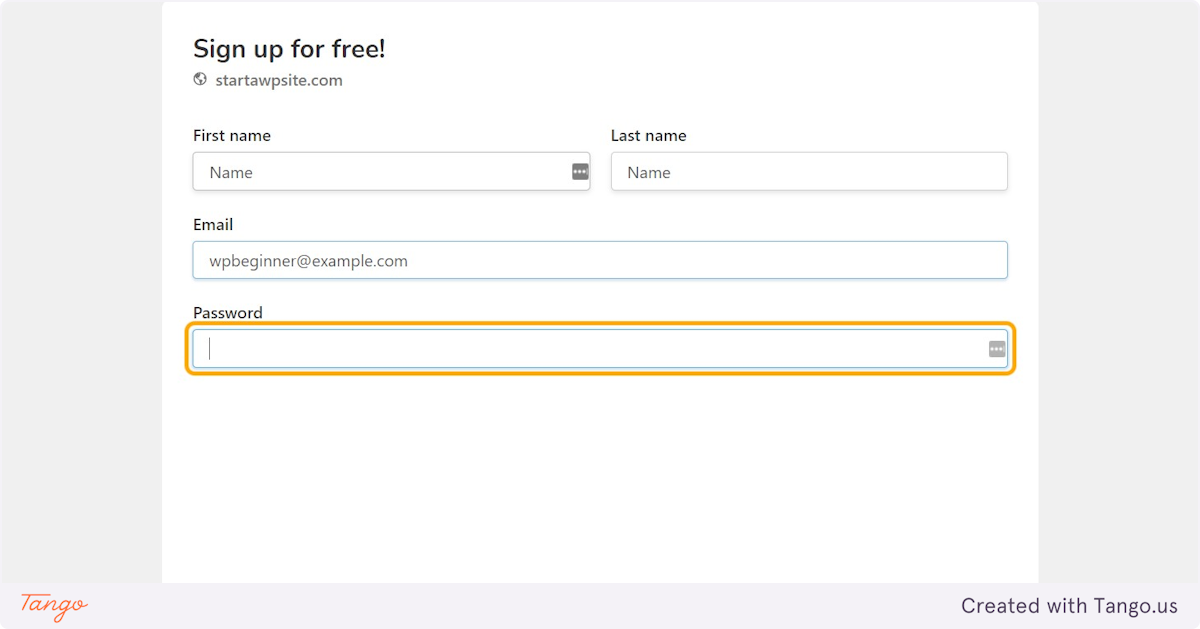
10. Type password
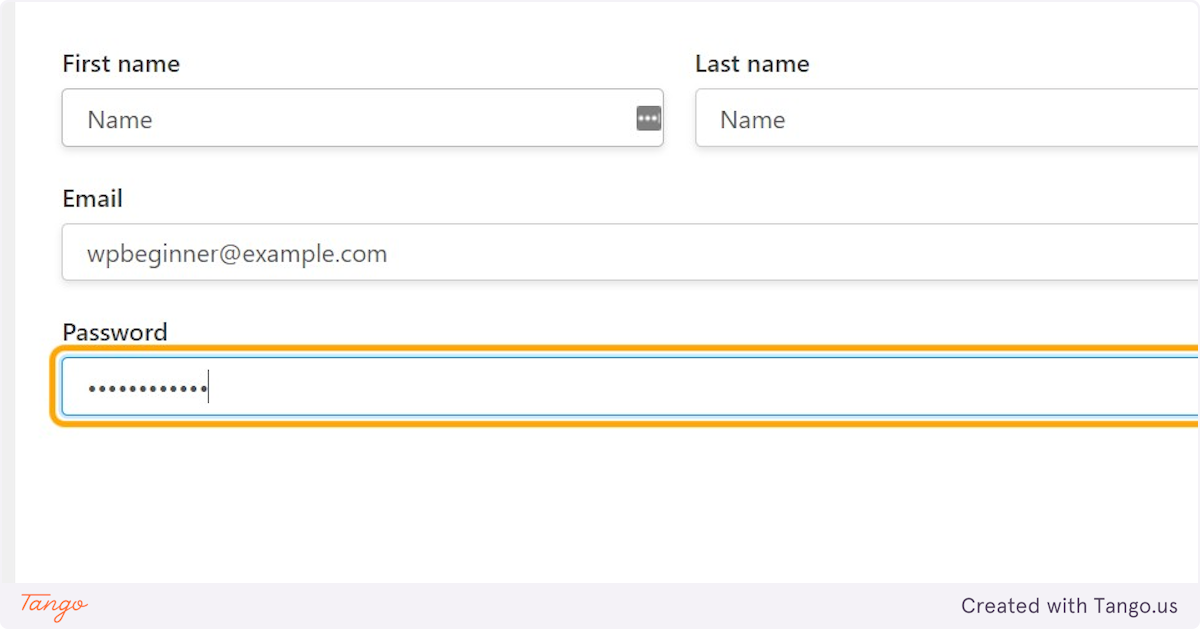
11. Click on Sign up

12. Type “wpbeginner1@example.com”
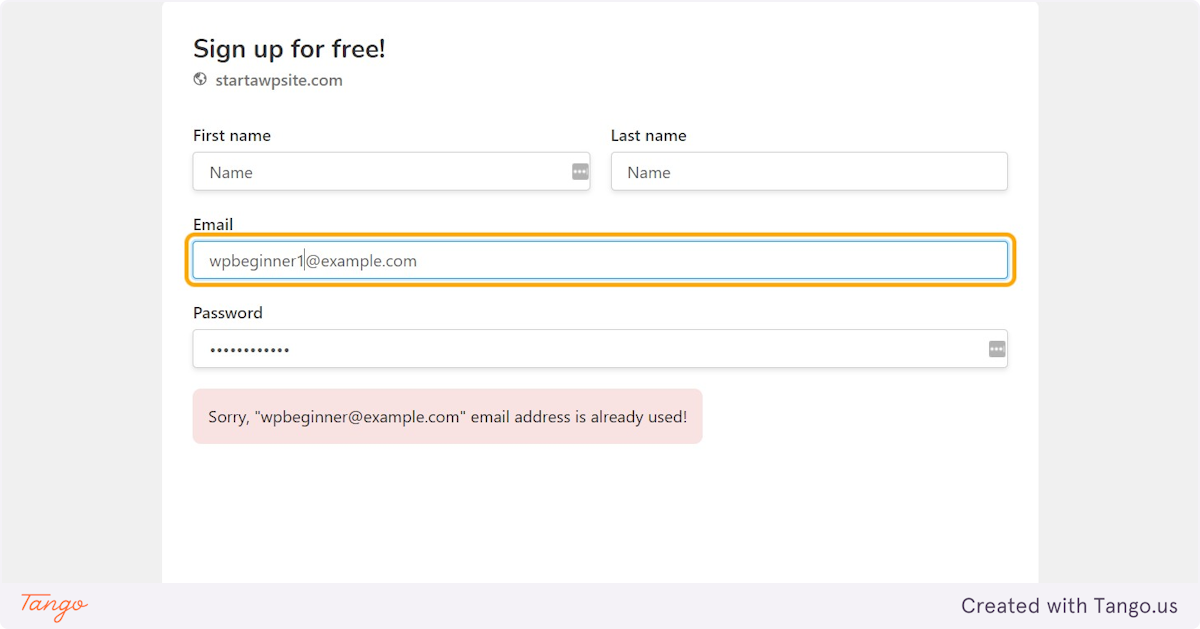
13. Click on Sign up

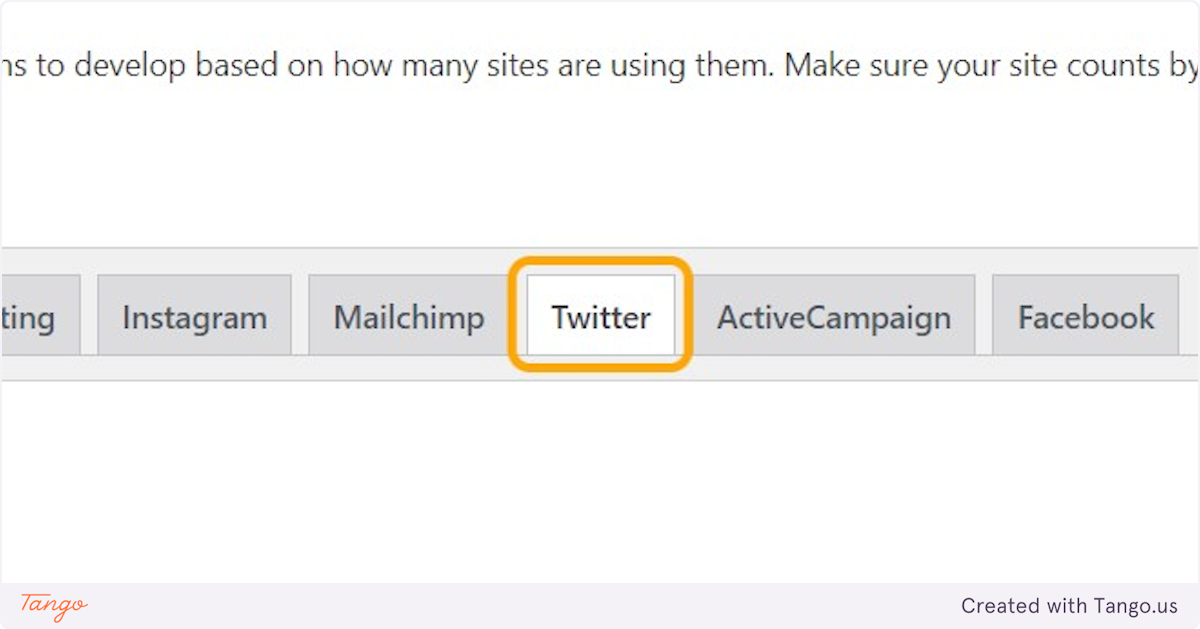
14. Click on Twitter
Created with Tango.us
Categories
Convert Blocks
Do you want to bulk convert your old content using classic blocks into the Gutenberg (block) format in WordPress?
After updating to any version above WordPress 5.0, your older post and page content will show up inside a Classic block in the new WordPress content editor. If you have dozens or hundreds of posts, then converting that Classic block content into individual blocks can take a lot of time. Thankfully, there is a bulk convert option.

In this article, we will show how to easily bulk convert classic blocks into Gutenberg blocks in WordPress.
How to bulk convert classic blocks to Gutenberg in WordPress
Why Convert Classic Block Into Individual Blocks in WordPress?
If you have had a WordPress blog for a long time, then chances are that some of your posts were written using the older classic editor.
This older content will now appear inside the Classic block in the post editor.
Classic block preview
By converting the classic block into individual Gutenberg blocks, you will gain more control and flexibility over your content.
You can easily edit your post by working with individual blocks. You will also be able to take advantage of the customization options available for each block.
Block editor features
This helps you easily edit the content within the block editor while allowing you to create beautiful content layouts for your posts and pages.
Note: In most cases, switching from the classic to the block editor will not affect your posts on the front end.
That being said, let’s see how to easily bulk-convert classic blocks to Gutenberg in WordPress.
Method 1: Convert Classic Block to Gutenberg Using Default Settings
Method 2: Bulk Convert Classic Block into Gutenberg Blocks
Method 1: Convert Classic Block to Gutenberg Using Default Settings
If you want to convert a single post or page from the Classic block into individual blocks, then this method is for you.
First, you need to edit the post and page where you want to convert the blocks. You can do this by heading to Posts » All Posts in your WordPress dashboard and then clicking on ‘Edit (block editor)’ under the post.
This will open your post in the block editor. Then, click on the ‘Convert to blocks’ button in the toolbar at the top of the Classic block.
Click the Convert to block button
The Classic block will now be converted into individual Gutenberg blocks.
You can now access all the block settings for individual blocks from the right column. If you cannot see this panel, then click on the gear icon at the top right of the editor.
Access block settings
Once you are done, don’t forget to click the ‘Update’ button to save your changes.
Method 2: Bulk Convert Classic Block into Gutenberg Blocks
If you want to easily convert the Classic block into Gutenberg blocks for all the posts and pages immediately, then this method is for you.
Important: Make sure to create a complete WordPress backup of your site before using this method because you cannot undo the conversion once it’s completed.
First, you need to install and activate the Convert to Blocks plugin. For more instructions, please see our guide on how to install a WordPress plugin.
The plugin works out of the box and automatically bulk-converts any Classic blocks into Gutenberg blocks once it’s been activated.
All you need to do is simply edit a post or page that was written using the classic editor.
You will now notice that the Classic block has been converted into individual blocks.
Use a plugin to convert classic block into Gutenberg blocks
Remember that the conversion will not affect the layout of your posts on the front end, so the posts will look the same on your website.
This is how the same post looked on our demo site after converting it from Classic to individual blocks.
Preiveiw of a post
We hope this article helped you learn how to bulk convert classic blocks into Gutenberg blocks in WordPress. You may also want to see our beginners’ guide on WordPress SEO, and our top picks for the best contact form plugins.
If you liked this article, then please subscribe to our YouTube Channel for WordPress video tutorials. You can also find us on Twitter and Facebook.
Categories
YouTube Videos
Great video

Have you noticed how some popular sites show a reading progress bar indicator at the top of their articles?
This little bar shows users how much more of the article is left to scroll and encourages them to continue reading. It can help keep visitors on your website reading your content and improve the overall user experience.
In this article, we will show you how to add a reading progress bar in WordPress posts.

Why and When You Should Add Reading Progress Bar in WordPress
Users spend only a couple of seconds on a webpage before deciding whether to stay or leave. Keeping users engaged becomes a little more challenging if you publish long-form articles, as they require users to scroll down.
Some site owners add inline related posts, while others use videos or image galleries to keep users on the page.
A reading progress bar adds a little user-interface enhancement that encourages users to scroll down. It also motivates users to finish the article they are reading.
Many popular websites like to use the reading progress indicators to engage their readers. However, you also need to make sure that the reading progress indicator is subtle and does not distract from the content itself.
Having said that, let’s see how you can easily add a reading progress indicator for your WordPress posts.
Adding Reading Progress Bar in WordPress Posts
The easiest way of showing a reading progress bar in blog posts and pages is through a plugin like Worth The Read.
It’s a free WordPress plugin that’s lightweight and helps add a reading progress bar to your website. The plugin offers multiple customization options and lets you change its style to fit your website theme. You can even use it to show the reading time for your articles.
The first thing you need to do is install and activate the Worth The Read plugin. For more details, see our step-by-step guide on how to install a WordPress plugin.
Upon activation, you need to visit the Worth The Read Reading » Progress page from the WordPress admin panel and go to the ‘Functionality’ tab to set up your progress bar indicator.
Next, you can choose whether to show the progress bar on your posts, pages, and homepage. There’s also an option to display the reading bar on custom post types.

If you scroll down, you’ll find more customization options.
You can include comments in the total length of the progress bar by enabling the ‘Include Comments’ option. If you are including comments, then you can also choose a different background color for the comments progress area.
The plugin also lets you select the placement of the reading progress bar. The default option is on the top which is used by most sites. You can change it to display the progress bar on right, left, or bottom of the page.

Other than that, there are more options for customizing the reading progress bar.
For instance, you can move the bar from right to left, use fixed opacity, enable the progress bar for touch devices like mobiles and tablets, enable the debug mode, and more.
When you’re done, don’t forget to click the ‘Save Changes’ button.
Next, head over to the ‘Style’ tab under Reading Progress to edit the appearance of the reading progress bar.

The plugin allows you to choose the thickness of the progress bar and select foreground and background colors to match your WordPress theme.
The background color is used to fill the empty progress bar and the foreground color will be used to show progress as a user scrolls down.
It even allows you to use a transparent background for the progress bar. Checking this option will override background color options and only the foreground color will be displayed as users scroll down an article.
After editing the style, don’t forget to save the changes to store your settings.
You can now visit any blog post or landing page on your website to see the progress bar in action.

- TikTok Dance Video Contest
- Hashtag Video Challenge Contest
When it comes to talking about whatever is on this page.
- Sports Events Video Contest
And then you have another break in the conten.
- Talent Video Contest
And then you start to add content here
- Dare for Likes Contest
- Facebook Video Poll Contest
- Video Caption Contest
- User-Generated Video Contest
- Video-Based Feedback Giveaway
- Follower-Milestone Video Contest
- Product Tutorial Video Contest
- Content Idea Giveaway Contest
- Holiday Themed Video Sweepstakes
- Funny Home Video Contest
- Regular Video Giveaways
Categories
Hello world!

Welcome to WordPress. This is your first post. Edit or delete it, then start writing!